Followers

Wednesday, December 28, 2011

Gobble it Up!

   This one is going out by request.  On my friend's facebook post, her friend asked if anyone had a recipe for breakfast sausage that did not use pork.  This turkey sausage recipe is useful for people looking for food free of chemicals.  Plus it just tastes great.  I've even had my 'teen nephew tell me, "It tastes like real sausage."  It makes a wonderful addition to a big weekend breakfast and I have also made it ahead for a special brunch and kept it warmed in the crockpot.  The longer you let the sage sit the more flavorful the sausage becomes.  The recipe can be made with fresh sage.  I've only used dried and have been satisfied with the results. 

Breakfast Turkey Sausage
Adapted from the Beat the Yeast Cookbook by Charlene Grimmett

1 pound ground turkey
3/4 teaspoon sea salt
1/4-1/2 teaspoon black pepper
1/2-1 teaspoon dried sage OR 10-12 fresh sage leaves, minced

Mix turkey with salt, pepper and sage.  Use a fork or a food processor for less than one minute. Shape into 6 thin patties or several links. Fry or bake until browned. You can freeze the sausages, either raw or cooked, for future breakfasts.

Saturday, December 17, 2011

Jingle Aldi Way

   Let me just say first that I am not being compensated for this post; it is purely my opinion and experience.  Okay, now that I've got that out of the way let me get on my outsidethesoapbox.  This will be more useful to my friends that have an Aldi store nearby, but you could also use this information to find a discount store in your area.

  I heard about Aldi's at least a decade ago.  The ladies at work and my mother-in-law shopped there and told me about the great prices.  At the time, I had my preferred supermarket and didn't feel like going across town (not that it is really that far) just to say a few cents on eggs. 

   One day my Mom and I were on our way back from an appointment and we stopped in to pick up a few things.  I was surprised by the prices on fresh fruits and vegetables and they weren't old ones about to be pitched.  I bought a few things and was pleased with the quality. 

  This month I did actual weekly food shopping there.  If you are brand particular it may be difficult to find every item on your list, but I was able to get our necessities.  I actually liked shopping in the smaller store since navigating the megamarts can take so long to just get a few things.

  I had an impression that it was cheaper because it was not as nice as the regular supermarket.  Then I read an article indicating that it was not due to inferior items but that they had lower overhead.  It is similar to the warehouse clubs but without having to buy huge quantities. Plus there is no membership fee to shop there.  There is no on site bakery, fish or meat department.  They only take debit cards or cash.  This was an adjustment for me as I tend to charge my groceries.

  You bring your own bags.  This does make a little work for the shopper, but it is probably better for the environment anyway.  One of the reasons for savings that surprised me was that colored packaging costs more.  By only printing a few colors on the box it made the item cost less.  Well, I'm not eating the package anyway!  Plus being an "outside the box" person I tend to steer away from heavily processed foods.  They have plenty of that at Aldis, but so does my usual supermarket.  Another way they keep costs down is to have you put a quarter in the cart so they don't have to pay an employee to corral the carts. 

   I am most satisfied with their fresh produce and frozen wild caught fish. I was able to purchase enough items on my last visit to make a week's worth of meals and at half the price of my usual store.  By using this option that will give me a little more jingle in my pocket and who doesn't want that during the holiday season?


Thursday, December 15, 2011

Chicken, Chicken

    When I was a senior in high school, we traveled to Old Quebec on a school trip.  While staying with my host family, we sat down to a chicken dinner one evening.  The son's friend said to me, "Chicken, chicken," to which I replied that is was lovely or delicious or something in French I don't recall.  Canadian French turned out to be different than the old school French we were learning so much of what I said sounded like I was talking to my grandmother and not a teenager.  Anyway, this went on for a few rounds of "chicken, chicken, " until Ingrid the teenage daughter haltingly explained in English, "My brother's friend is thinking it is funny that chicken is food and also scared. It is a scared bird, no?"  To which we all had an "Ahhh, chicken, chicken" laugh.
   
   This tidbit is being shared with you because I spotted roasters on sale this week for 69 cents a pound, so it became a "chicken, chicken" week at my house. I really think we need to make up a new word for leftovers.  I enjoy taking leftovers and using them as material for another meal.  The first night we had roast chicken with mashed potatoes and broccoli.  The broth was put aside in the freezer to add to other recipes. Two nights later so it's not reruns every night, I tossed cubed chicken with leftover spaghetti, plain yogurt, mayonnaise, cheese, dill and garlic and baked it in the oven for a chicken casserole.  I sauteed up some green beans with garlic on the side.

    The chicken bones were boiled down for soup.  I have my own method for making soup using a steamer pot.  I find it easier than pulling bones out of the pot.  Once I get my broth ready, anything in the fridge is fair game to go in the pot.  This week, I found fresh carrots and celery, a cooked potato, leftover green beans, and corn.  I had overdone the garlic on the green beans so I didn't have to season the soup with much more than parsley.  I sometimes add a bay leaf as well.  Soup makes an excellent use of lots of bits of food and if you are lucky, you will have a bowl leftover for lunch!

Micky's Chicken Soup

  Place chicken carcass in a steamer inside the stockpot with celery leaves.  Cover and let it come to a boil.  After 20 minutes remove the steamer pot and let chicken cool about 5 minutes.  In the meantime, chop up any carrots, celery or fresh vegetables and add to the broth.  Pick the chicken into 3 bowls: good chicken for the soup, fatty chicken rejects and skin for the dog, and bones for the trash.  Believe me, the dog loves soup day.  Dump the chicken pieces in the pot and let it simmer for about an hour.  Add any cooked vegetables later so they don't turn to mush.  I've even used up cabbage after St. Patrick's day.  By cutting it into long strips the kids thought it was like noodles.  It's never the same soup twice since I throw in whatever is handy, but it is always a satisfying meal. 

Thursday, December 8, 2011

Advent-ure

   I remember the excitement of waiting for Christmas as a child.  There was the family tromp through the woods to cut down the perfect tree with Dad's red saw, followed by cocoa to defrost everyone.   Once the tree was set up we decorated it while listening to John Denver's Rocky Mountain Christmas.  Decorating cookies was a family event with Mom's Super Shooter pressing out dozens of confections and the kids in charge of sprinkles and the cut up maraschino cherries for the wreath bows.  Christmas Eve meant going to Grandma and Grandpa's house to be with all of the cousins for open house. 

  As a child it seemed so simple and carefree, a magical time of year.  I can hear my Dad and Aunt Janet singing carols around the piano.  It's hard to believe that my parents didn't feel any stress carting us to family parties, baking cookies, wrapping presents, hanging lights, stuffing stockings, and keeping us fidget-free during mass.  If they did, I don't remember them mentioning all the work that goes into the season. I'm glad that I have all the wonderful memories of the Christmas season with my family. 

  One way that kids can count down to Christmas is with an advent calendar.  Instead of using one of the packaged ones with a little treat inside, I decided to add a new holiday tradition to my family.  Each day we try to catch someone doing something nice for others.  When we do we write it on a post-it note and put it on the calendar.  I am calling it a "Kindness Calendar." 

  Both children have their own calendars and are enjoying finding ways to fill them up.  My little one fed the dog and asked, "Is that a kindness?"  I certainly agreed the dog would find it kind to be fed.  I opted for the post-it notes instead of stickers, since my oldest can read and I thought it would be fun for him to see all the helpful things he does in writing, rather than a sticker each day.  There will still be gifts under the tree and stockings stuffed with treats in my house.  With the "Kindness Calendar" my hope is to remind my children to think of others during this special time of  waiting for Christmas to arrive.
 

Saturday, December 3, 2011

Sicknic

A sunny breakfast for the sniffly crew.
   When I woke up this morning to the cacophony of coughing and the sniffling symphony I knew it was going to be a sick day.  My first reaction was to park everyone in front of the television in their pajamas.  I had made salsa the previous night and was going to add it to scrambled eggs, but taking my cue from the B.R.A.T diet of Bananas, Rice, Applesauce and Toast I decided to scale back.  I thought a light meal was the way to go instead of forcing their appetite with possible messy consequences.

   I sliced up oranges for their cold fighting vitamin C.  Next I made honey toast. My husband introduced me to this sick day staple.  The first time he suggested I thought it sounded strange, but the honey soothes the throat and it is a comforting food when you don't feel like eating.  I brewed up some Gingerbread Spice tea with no caffeine.  I didn't need cranky people plus caffeine. This helped keep up the fluids and the warm liquid is another throat soother. For dessert (to make sure I wasn't making anyone finish their plate) I served frozen blueberries in applesauce for antioxidants and a soft easy to swallow food. I put it on paper plates and there you have it, a sick day picnic or my new word, sicknic.

   After breakfast I set up a tent in the living room by attaching a play parachute to the curtain rods and over the arms of a chair.  They snuggled in there amongst the pile of blankets and a box of tissues reading books.  The sun streamed in through the window making this a tempting spot to curl up and take a nap.  While I was out of the room, the oldest one decided to cut out paper dolls clothes to help his sister.  Instead of being miserable and sick, their sicknic and tent kept them happy campers.

Sunday, November 27, 2011

Sweet and Sour Tenderloin


  Tonight was our first night to be treated to Dan's fresh venison.  He cooked up a delicious Chinese style stir-fry.  It would be great served over rice.  Feel free to substitute pork, chicken or beef for your own dinner.  If you are allergic or soy sensitive there's no need to be deprived of good Chinese food. The pineapple and hot sauce made a delightful sweet and sour sauce.  Using frozen vegetables makes this meal a snap.  I think he prepared it in less time than it would have to go pick up an order of take-out!  It was so good I asked him to share his recipe.


Sweet and Sour Venison Stir Fry

Dan's Venison Stir Fry

 Brown 1/2 pound tenderloin in olive oil. Add 6 ounces Drew's Kalamata Olive dressing.  Add half a can of chopped pineapple with juice plus one tablespoon of Frank's Red Hot sauce. Simmer for 5 minutes.  Add a bag of frozen broccoli, carrots, and water chestnuts. Cook about 10 minutes for the vegetables to thaw. 

The Big Chill?

    We are getting ready for the long winter ahead.  I know it's not Little House on the Prairie and we can go to the grocery store instead of hitching up the wagon for provisions in town.  Dan has been splitting wood to stack up for the wood stove.  He's also got a five point deer that will give us plenty of meat to stock in the freezer.  This brings me to my debate: to buy the deep freeze or not to buy the deep freeze?
 
 We froze bags of peaches from our tree and a few bags of apple cider.  We have a refrigerator unit with the freezer compartment at the top, so there is just so much you can hold.  Dan suggested we get an additional freezer so we can save more of the peaches next year. If I was really ambitious I could blanch green beans and produce from the garden as well.  We did use much of what we had this year and shared produce with visitors, but there were a few eggplant that did not make it into the pot.  Maybe if I had extra freezer space I would be more inclined to cook them up to preserve for the winter months. 
 
 There's also the savings to be had if you buy in bulk.  There are two things holding me back here.  I picture a lone roast in the bottom of the deep freeze and me on my tippy-toes precariously balancing to reach it.  When I pull it out it turns out to be a roastcicle full of ice crystals after a 4 year storage in the bottom of the chest.  Also, I have heard that the electricity cost can end up outweighing or equalling out the initial food savings. 
  
 I'm going to need some help with this one before I can make a decision.  Please share your thoughts on the wisdom of buying an extra freezer verses staying with just our current unit.  I'll need opinions as well as important sounding research from Consumer Reports. Maybe you can thaw my extra freezer indecision.

Saturday, November 26, 2011

Shop Small

     Today is Small Business Saturday.  As someone who likes a bargain, the big box stores can be tempting.  I used to shop the malls for all my holiday gifts.  Then, I had my own children and not only was it torture for me to drag the little ones through the mall, but then you have to hide everything from them so it is a surprise.  Between lines to get into the parking lot and crowds to navigate through and the overheating in my winter jacket while shopping it just seems like so much work.  Before you mark me down as an awful Scrooge, I have a solution to my holiday shopping cynicism.
    Shop your local stores.  Who doesn't want to save on gas money by not traveling "over the river" to get to the mall metropolis?  Small stores appreciate business so are more apt to have that old-fashioned notion of customer service.  For those of you unfamiliar with this term, let me define it.  It involves a human being offering assistance in some form.  Smaller stores are easier to make a quick trip since there aren't 6 million items to walk through to get to the one you are looking to buy.  This is apt to save me money as well.  If there is less to look at and less time spent shopping, there is less to bring home.
   Smaller stores are more convenient for me.  I can be in and out of the store instead of having an all day excursion.  Knowing that I am keeping a local family employed is rewarding as well. Plus, there are some unique items in those little stores that aren't a repeat of every store in the mall.  Of course, I'm saving my most important resource as well, my time, energy and sanity!

Saturday, November 19, 2011

Crantastic

Homemade Cranberry Sauce
Take the picture quick before it's all gone.
   As I look forward to the holiday with family this week, I am feeling truly thankful.  First of all, we get to spend time together.  Secondly, we all live near each other so nobody has to make the effort of huge travel arrangements.  Most important of all we are going to my sister's house so all I have to do is bring a dish to share.  Now that is good news to me! 
   Last year I happened upon a book called The Thanksgiving Bowl by Virginia Kroll.  The bowl gets left out after the holiday dinner and ends up traveling about the neighborhood animals before making it back to Grandma's house.  Everyone fills the bowl with "I am Thankful for" slips of paper then takes turns guessing who's slip of paper it is.  We tried this and it was fun to see all the different answers.  The kids were thankful for food or toys, but the adults had more wistful and profound gratitude for family, new opportunities and the simple joys of life.  It is easy to get caught up with the prep and busyness of the holiday season.  Taking time out to appreciate the ones we love, the roof over our head, wonderful friends and the start of each new day is more important to me than all the trimmings on the table
    I whipped this cranberry sauce recipe up while we were watching the parade.  Yeah, less time in the kitchen and more time to relax and enjoy the holiday! I've never been a big fan of homemade cranberry sauce, preferring the canned over the lumpy kind as a child.  This recipe is made using canned apple juice for sweetener.  I used the entire 12 ounce can and skipped adding sugar.  I threw it in the food processor and blended until smooth before chilling. This one was hugely popular with the kids' table.  They even asked for seconds!
    
Cranberry Apple Sauce II
 http://allrecipes.com/recipe/cranberry-apple-sauce-ii

12 ounces fresh or frozen cranberries
6 ounces unsweetened apple juice concentrate

Directions:

In a sauce pan, combine the cranberries and apple juice. Cook over medium-low heat until berries burst. Additional sugar may be added if desired. Mix well, chill and serve.

Wednesday, November 9, 2011

Piece of Cake


Dan's Birthday Cheesecake
      I know I should know better.  I actually thought of making things easy on myself.  I told myself it was okay to pick up a cake for my husband's birthday this year since it was in the middle of the week and he had a meeting that night so we weren't going to have much time for a big celebration that night.  I was out at lunch with a friend on Friday and saw that our local coffeehouse sells cheesecakes.  I e-mailed them to see if I could order one.  In the meantime, I remembered that I had a healthy recipe for cheesecake in a cookbook at home.  I decided to go ahead and make the effort to have a homemade cake.  Plus, I googled the Cheesecake Factory and I could make this whole cake for the price of one slice of theirs. 
     The cookbook suggested a cranberry-raspberry sauce, but I wasn't sure how that would be received.  I decided to save my fresh cranberries for Thanksgiving and made a strawberry-raspberry sauce variation instead.  I used regular cottage cheese instead of lowfat. I opted for the food processor rather than the blender. My cake baked up shorter than I expected, but I used a wider springform pan than recommended in the cookbook. The cake was very popular.  I had to grab the last slice off the table to share over tea in the morning with my favorite blogger: http://cleaninguptheclutter.blogspot.com/.

Cheesecake
from: Fat Flush Cookbook by Anne Louise Gittleman

1 pound 2 percent cottage cheese
1 cup mashed ripe banana
2 packets Stevia Plus
Juice of 1 lemon
4 eggs, beaten
1/2 teaspoon vanilla extract

Preaheat oven to 350 degrees. Place cottage cheese in a blender and blend until smooth. Add mashed banana, lemon juice and Stevia Plus and blend until mixed. Beat eggs one at a time and add to the mixture, blending well after each addition. Pour the mixture into a lightly greased (use butter), 8-inch springform pan. Bake for 35 minutes. Remove from oven and loosen cake from sides of pan with a knife. Cool and then chill for several hours or overnight before serving.

Quick Cran-Raspberry Sauce (also from Fat Flush Cookbook)

1/2 cup cranberries
1/2 cup raspberries
1/2 teaspoon orange zest
3/4 teaspoon Stevia Plus

Place all ingredients in a blender and blend until smooth. Heat in a saucepan for about 2 minutes or until hot. Serves 1.

My Stawberry-Raspberry Sauce
2 cups frozen raspberries
2 cups frozen strawberries
2 packets PureVia (Stevia)
3 Tablespoons Orange Juice

Thaw berries for 2 minutes in the microwave. Blend all ingredients in the food processor adding just enough orange juice to moisten the berries. Place berry sauce in pastry bag and dot on plate for serving or decorate cake.  This produced a large quantity of sauce to use up on another project later.


Saturday, November 5, 2011

Duck, Duck, Goose

Pan seared duck
   I had never cooked a duck before.  In fact, I could barely remember having it out at a restaurant more than once.  My husband brought home duck so I couldn't just let it go to waste. Hmmm...what does one do with a duck?  A quick internet search led me to recipes involving berry sauce reductions.  This was not exactly where I wanted to go with a quick dinner plan.  Plus, my husband is not a huge fan of sweet sauces on meat.  He ordered a pork tenderloin at a lovely restaurant and was not thrilled with the cranberry "roof" when the meal came.  For these reasons, I decided to quickly sear the breasts according to Emeril's recipe.  It said to slice them so the cooking took a bit longer when I left them whole.  I've been told that duck is very greasy, but we had skinless breasts and there was no greasy or oily taste.  Surprisingly, duck has more of  a red meat flavor.  It doesn't "taste like chicken."

http://www.foodnetwork.com/recipes/emeril-lagasse/pan-roasted-duck-breast-recipe/index.html

Saturday, October 29, 2011

Snowy Day Soup

Steamy Sausage Soup for a Snowy Halloween  Week
   Dan brings in the last of the white eggplant from the garden, 3 medium and one tiny.  We also have two straggler tomatoes. As I am cooking up the last of our summer harvest in October, fat snowflakes are starting to fall.  When I heard the weather forecast, I assumed that it was one of those storms that may bring in snow and after all the excitement and lines at the store it just blows out to sea leaving us with a little rain and stocked pantries. As I simmer the sausage the snow is really starting to come down.  By the time I finish cooking dinner it is actually piling up on my car.  It's a good thing I didn't leave anything in the garden to freeze!
  
Summer Soup (on a Snowy Day)

1 package of hot sausage (5 double links)
3-4 white eggplant
oregano, garlic, basil
2 tomatoes
1 can crushed tomatoes

This is not from a cookbook so bear with me as I estimate amounts.  Saute the sausage for 20 minutes while peeling and dicing the eggplant into tiny squares.  Add the eggplant with the olive oil, garlic, basil and oregano and cook everything for another 10 minutes, until soft.  Remove the sausages and slice in circles, then put them back in the pot to cook thoroughly another 10 minutes.  Add the crushed tomatoes and fill the can with water letting that simmer for another 10 minutes.  Dice the tomatoes and add towards the last 5 minutes to keep them from getting mushy.

Saturday, October 22, 2011

Bean There, Done That

The very full colander of beans
      I didn't feel like going to the market, yet peeking in my refrigerator indicated that we were on "Old Mother Hubbard" alert.  Fortunately it wasn't the cupboards that were getting bare, just the fridge.  I decided to raid the pantry to come up with something for us to eat.  I had a bag of kidney beans from the co-op that had been kicking around for months.  I had stocked up on an assortment of goodies from the bulk aisle yet every time I went to make chili, soup or anything that required beans, I always opted for canned beans to get the job done quicker.  I had never planned ahead to let the beans soak overnight.  It was time to let the beans out of the bag rather than having to face the Sunday grocery crowd.
    I opted for my Betty Crocker Cookbook  rather than sorting through a bunch of clippings in my "New Recipes" binder on how to prepare dried beans.   Their directions were for 1 cup of dried beans to make 2 cups prepared beans.  I poured the whole bag in the pot figuring I could use the beans in chili, salad, soup, or freeze half the batch.  I didn't soak them overnight, but used the quick boil method. My bag of beans produced 9 cups of prepared beans.  That's a lot of raw material for meals! 

Preparing Dried Kidney Beans  
from Betty Crocker Cookbook Bridal Edition

Sort beans, rinse and drain. Place 1 cup legumes in 3 to 4 quart saucepan. Add enough cold water (about 3 to 4 cups) to cover beans. Heat to boiling. Boil uncovered 2 minutes. Reduce heat to low. Cover and simmer (do not boil or beans will burst), stirring occasionally for 1 to 2 hours or until tender.

Saturday, October 15, 2011

Catch of the Day

  For some reason, I am reluctant to work with fish.  I have this concept that it will go bad before I can cook it.  If it is previously frozen you really should use it right away, as opposed to "regular meat" that you can freeze if you don't get around to using it is two days. 
  I cooked the fish plain in the oven  simply because I thought it would be easier to not have to stand over the stove.  It was good, but I must say I prefer the way Dan prepared it last week.  His method is to put a stick of butter in the skillet, add a pound and a half of haddock and pan fry it for about 10 minutes. 
   However, my homemade tartar sauce was a big hit both times.  This time I made a big batch of sauce so I added ketchup to the leftovers and used it on roast beef for sandwiches.  I also cut up a sweet potato to bake since I had the fish in the oven.  I recommend putting these in first since they need an additional few minutes cooking time.

Baked Fish Fillets from: Betty Crocker's Cookbook Bridal Edition

1 pound fish
2 tablespoons butter
1 tablespoon lemon juice
1/4 teaspoon salt
1/4 teaspoon paprika

Heat oven to 375 degrees. Spray a rectangular pan with cooking spray. Cut fish into 4 serving pieces; place in pan. Mix remaining ingredients; drizzle over fish. Bake uncovered 15 to 20 minutes or until fish flakes easily with fork.

Tartar Sauce

1 cup mayonnaise
2 tablespoons finely chopped dill pickle or relish
1 tablespoon chopped parsley
2 teaspoons chopped pimento
1 teaspoon grated onion

Mix all ingredients. Refrigerate 1 hour or until chilled.

Tuesday, October 11, 2011

Crockpot Sanity

Turkey Meatloaf and Baked Red Potatoes
   I'm not a morning person, but realizing that I have an appointment at four followed by a meeting at 6 or 7 (I'm not sure what time yet) prompted me to put dinner in the crockpot at 8am today.  As much as I would like to just get the morning routine done and get going first thing (or hit the snooze button) I know that it is better for me to have dinner ready when I get home.  Let's face it we are all pulled in 100 directions each day whether you have kid activities to attend or are getting home from work after a long day at the office.  For somebody who likes to cook, I rarely actually want to cook at dinner time.  It will be a relief during our busy evening to have dinner ready, plus the mess is all in one pot. 
   This recipe would work with beef, I just happened to have ground turkey available.  I don't use any bread crumbs since I am eating a gluten-free diet, but feel free to add your usual meatloaf fixings to the pot. I threw this together without a recipe, so I will attempt to be coherent in my explanation. I hope there are some leftovers to make sandwiches for lunch tomorrow.

Micky's Meatloaf

1 package ground turkey 20.3 oz
1/2 lb frozen spinach
basil, oregano, minced garlic, minced onion
1 egg
ketchup, mustard
4 red potatoes

Place ground turkey into the crockpot. Pour 1/2 of a 1 lb bag of frozen spinach over it. I didn't measure my spices so I will have to estimate 1 tbsp each. Add less if you prefer less spice. I didn't add an egg, but I felt I should put it in the recipe. Squirt about 1/4 cup ketchup over the mixture.  I use a sugar and cornsyrup free ketchup that contains Agave nectar.  Add about 1 tbsp mustard.  Now get your hands in there and mix everything together.  Tuck the meatloaf in the corner and top with a squeeze of ketchup and mustard.  Scrub the potatoes and place them in the pot.  Cook on low for 8-10 hours.  I have veggies leftover from last night, but you could add a quick steam-in-the-microwave bag to round out your meal. Top the potatoes with plain yogurt and chives.

Monday, October 10, 2011

An Apple A Day...

Grab your cup the press is flowing.
   There is just something about fall, the crisp scent in the air and the crunch of leaves.  As much as I mourn the closing of the pool and the need to put away my sandals, fall has it's own special traditions.  In my house these include making apple cider.
   My father-in-law decided to build his own apple press about 5 years ago and ever since then we have been enjoying gallons of the sweet drink and the production time together.  First we gather apples from our neighbor's tree.  My husband climbs up and shakes the tree like a monkey in the zoo.  Once the apple meteors stop falling, we gather them up from the tarp spread below and fill the bucket to haul to the truck.  One year we had the bed of the truck filled.
     Apples get washed in one bucket and rinsed in the next.  Then they are thrown in the grinder.  This is another homemade gizmo where the apples spin around and are shredded.  Then we gather the apple mash up into a burlap cloth and place it in the press basket.  Pull the handle and the hydraulic press descends on the mash pile. This squeezes out the juice which flows into the bucket unless a cup intercepts the sweet flowing cider.

Sunday, October 9, 2011

Extreme Couponing

  I've been thinking a lot lately about how to save money.  I'm not about to start rinsing out sandwich bags to save a few cents, but I do have my ways of stretching the budget.  My favorite way of saving money is my babysitting co-op.  My friend formed it 4 years ago .  The great thing about it is that the kids play with their friends while we are out at an appointment, Christmas shopping or having a date night with the hubby.
   This is how it works.  We pay in coupons.  Each coupon equals one half hour of babysitting time.  There is a discount for multiple children so you only have to pay 3 coupons per hour for 2 children.  There is a maximum of 20 families in the group so that everyone is familiar with each other.  Whenever you need a sitter, you e-mail the group and whoever is available can answer your request.  Some people prefer to sit during the daytime; others are willing to come over to your house so the kids can go to bed.  There are also opensits.  This is when you babysit even though there is no appointment scheduled.  If I have an opensit, other mothers can work on a project, go to the store or go to the gym while their kids have a playdate without Mom.
   The best thing about the co-op is that there is no guilt.  You don't feel like you are taking advantage of a friend by asking for a favor.  You don't have to feel bad about how much money you need to pay a teenager while you go to a movie or dinner. If you aren't available to help out a friend, you know that there are other members in the group to answer the call.  When I joined I had envisioned occasionally using the co-op for that yearly OBGYN visit without the children in tow.  Now I use it for date nights, car shopping, and anything that is more easily done without the children present like getting the taxes filed.  The children really enjoy being with their friends.  I always thought the little ones would cry if we went out without them. When I told my husband a friend was having an opensit to earn coupons one night, my 3-year-old cut out a restaurant coupon and told us we needed to go to dinner so he could have dinner at his friends' house.  It turned out to be a very nice recommendation and a relaxing night out.

Saturday, October 1, 2011

Go Bananas!

   The weekends were made for a leisurely breakfast.  If you need a gluten-free recipe for pancakes, look no further.  It's also nice to use this simple back up recipe when you find you are out of pancake mix.  With very few ingredients you can whip up these delicious, from-scratch pancakes in a jiffy. It's a great way to use up those aging bananas in the fruit bowl.  The bananas add their own sweetness making syrup unnecessary.  The recipe makes one serving so make sure to repeat for everyone in your house.

Banana Pancakes
2 eggs
1 spotty banana

Mash the banana with a fork.  Scramble the eggs over the banana.  Melt a pat of butter in a skillet over low heat.  Pour the batter into the skillet and cook until the edges solidify. Flip the pancake.  Put a pat of butter on top so it starts to melt.  Sprinkle the pancake with cinnamon.  Cook until firm. Serve with a pat of butter.  Makes 1 serving.

Saturday, September 24, 2011

Jumbo Gumbo Jumble

Gumbo/Rataouille
     The original plan was to throw some Italian sausage on the barbecue for dinner.  I wasn't sure what else to pair with it and was hoping meal inspiration would sort itself out.  Realizing that I had frozen shrimp in the freezer I decided to get daring and try to make gumbo or technically jambalaya since that recipe called for sausage.  I ended up mashing the two recipes together based on what I had available.
     I started by sauteing the sausages over low heat.  Once that was started I planned to peel the shrimp.  I didn't want to cook them and then have to take the shells off.  Then I could just pop them in the wok and have a one pot meal.  I believe in saving energy, especially mine.  However, not only were the shrimp frozen but they needed to be de-veined.  Oh fun, there's something I do all the time.  I ran the shrimp under cold water and set about prepping them.  Who knew shrimp could be so time consuming?  I really had the impression this recipe was going to be a snap to pull together. Next time I will have to buy the prepped shrimp and skip that step.
Brr! Peeling Frozen Shrimp
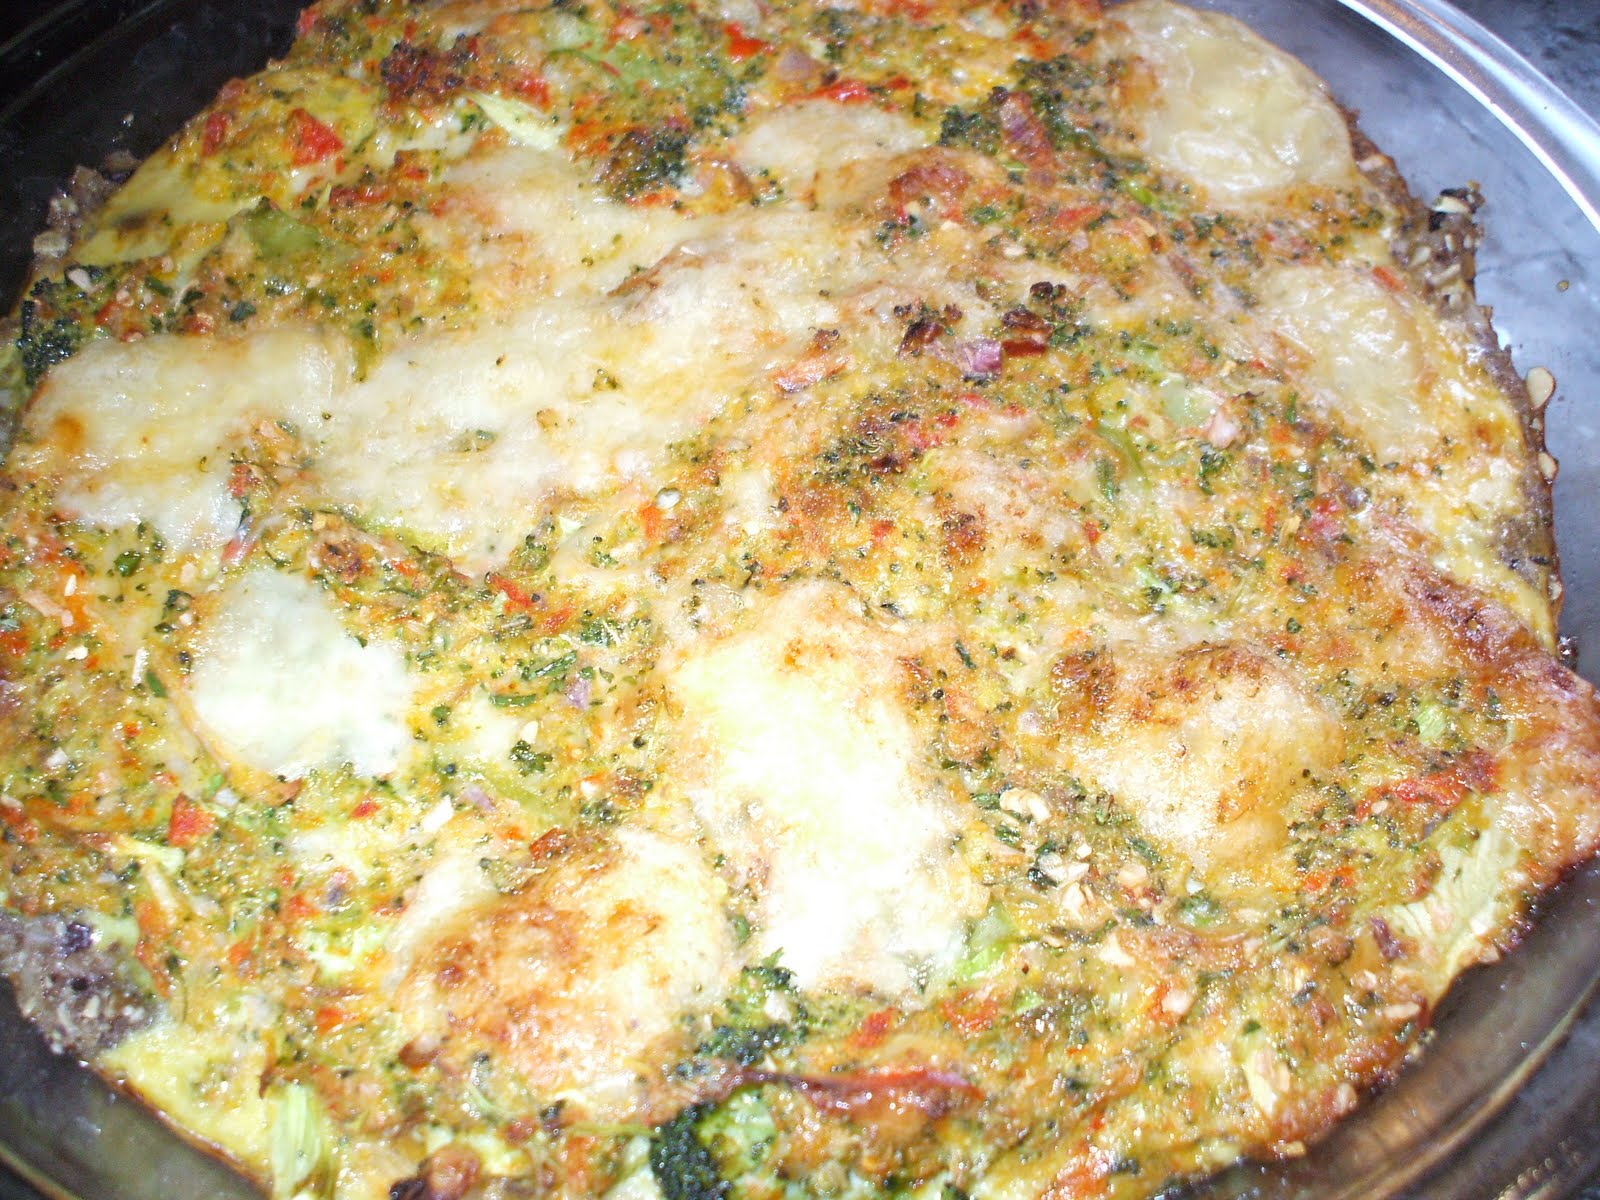
    Next I threw the shrimp in with the the cooking sausages. When they were turning pink I added a chopped jar of pickled okra because you always have that on hand, right?  I removed the sausages and sliced them up. Here's the part where I really veer off the recipe.  I added a gallon-sized freezer bag of ratatouille. I had made a double batch while the garden was plentiful and tucked it away in the freezer.  Please see "Easter Eggplant" for this recipe in my earlier post.  The sausages went back in to finish up.
   Since the ratatouille was already full of herbs I just added a dash of Frank's Red Hot and let everything simmer about 5 minutes.  The eggplant and zucchini released some water so I tried to let that cook down.  The recipe says to serve it over rice, but decided it was enough with all off the vegetables.  It produced six servings with leftovers and was met with good reviews. I offered Frank's Red Hot at the table in case anyone would like a more spicy touch. I am rather cautious with cooking seafood and was pleased that the shrimp were not overdone. I would recommended adding more water to serve it as a soup.

Both original recipes were found in the Betty Crocker Cookbook.

Shrimp Gumbo

1/4 cup butter
2 medium onions, sliced
1 medium bell pepper
2 cloves garlic, finely chopped
2 tablespoons all-purpose flour
3 cups beef broth
1/2 teaspoon red pepper sauce
1/4 teaspoon salt
1/4 teaspoon pepper
1 bay leaf
1 package (10 ounces) frozen cut okra, thawed
1 can (14 1/2 ounces) whole tomatoes, undrained
1 can (6 ounces) tomato paste
1 1/2 pounds uncooked fresh or frozen medium shrimp in shells
3 cups hot cooked rice
1/4 cup chopped fresh parsley

1. Melt butter in 4-quart Dutch oven over medium heat. Cook onions, bell pepper, and garlic in butter 5 minutes, stirring occasionally. Stir in flour. Cook over medium heat, stirring constantly, until bubbly; remove from heat.
2. Stir in remaining ingredients except shrimp, rice and parsley, breaking up tomatoes with a fork or snipping with kitchen scissors. Heat to boiling; reduce heat. Simmer uncovered 45 minutes, stirring occasionally.
3.Peel shrimp. (If shrimp are frozen, do not thaw; peel in cold water.) Make a shallow cut lengthwise down back of each shrimp; wash out vein.
4. Stir shrimp into gumbo. Cover and simmer about 5 minutes or until shrimp are pink and firm. Remove bay leaf. Serve soup in bowls over rice. Sprinkle with parsley.

Quick Jambalaya


1 package (8 ounces) brown-and-serve sausage links
1 1/2 cups uncooked instant rice
1 1/2 cups chicken broth
1 teaspoon chopped fresh or 1/4 teaspoon dried thyme leaves
1/4 chili powder
1/8 teaspoon ground red pepper (cayenne)
1 small green bell pepper, chopped (1/2 cup)
1 small onion, chopped (1/4 cup)
1 can (14 1/2 ounces) stewed tomatoes, undrained
1 package (10 ounces) frozen quick-cooking cleaned shrimp

1. Cut sausages diagonally into 1-inch slices. Cook as directed; drain.
2. Stir in remaining ingredients. Heat to boiling, stirring occasionally; reduce heat. Simmer uncovered 10 minutes, stirring occasionally.

Sunday, September 18, 2011

Dinosaur Delights

     I attempted to make a cake from scratch.  Here's a little advice from my experience: leave your self plenty of time for a "dry run" before making something that you will serve to company.  Or you can be like me and have 7-10 different recipes for carob cake that you juggle to see which one has ingredients you may have heard of while you are trying to make a cake for a party tomorrow. In this case I went with the recipe for "Wacky Cake" since it looked less complicated than the 3 page long number that called for arrowroot and several other ingredients that were non-existent in my pantry.  I mixed the ingredients and it looked like brown soup, but I tried to keep positive and hope it would miraculously rise during the baking process.
     I doubled the recipe and cut it to look like a dinosaur.  I used carob chips for the eyes and toenails. There was a bit of cake leftover so we called that the swamp that the dinosaur swam in. You can catch a glimpse of the swamp in the picture.   The cake turned out super moist.  It didn't rise much although it did solidify while baking.  It took on more of a brownie quality than cake consistency. The frosting was amazing with a little dab of food coloring for the dinosaur green.  Next time, I think I will experiment more before debuting a new recipe, but I will keep the frosting on file.

"Wacky Cake" (Poor Man's Cake)

1 1/2 cup flour
1 cup honey
3 tbsp cocoa or carob powder
1 tsp baking soda
1/2 tsp salt
6 tbsp olive oil
1 tsp vanilla
1 tbsp vinegar
1 cup water
1 egg (optional)

Stir and mix with electric mixer and bake at 350 degrees in ungreased 9 x 13 baking pan , 25 to 30 minutes.


 Vanilla Buttercream Frosting
 from www.madhavasagave.com

1/2 cup unsalted butter
6 tbl Agave Nectar
1 cup nonfat dry milk
1 1/2 tsp Vanilla extract
4 tbl whole milk
pinch of sea salt

Cream the butter with an electric mixer until light in color. Slowly add the agave nectar and beat until fluffy, about one to two minutes. Gradually add the dry milk and beat again.  Add the salt, turn the mixer to high speed, and beat about two minutes, or until very fluffy.  Makes 2 cups. Store in refrigerator for up to 3 weeks.

Thursday, September 8, 2011

Yes We Have More Bananas

   Unlike the song that I'm sure you will thank me for placing in your head we always have bananas.  When they don't disappear into snackers or cereal I look forward to them turning spotty so I can make up a batch of my favorite muffins.  I usually double the recipe to make one dozen regular sized muffins and 2 dozen mini muffins.  Then I promptly freeze about half in Ziploc containers to have a handy snack or breakfast on a busy day.  That way I can enjoy baked goods on another day without having to clean up the kitchen again.  If you pop the frozen muffins on a plate in the microwave it gives them that "just out of the oven" warmth.
    To be honest with you the muffins in the picture are from a new recipe that was okay.  I'm sharing with you my favorite recipe instead.  These muffins always turn out moist and can be served as a dessert.  If you want to go all out, I'll include the icing recipe, though I usually serve them plain.

Banana Cupcakes
From Covered in Honey by Mani Niall

2 cups flour
1 tsp baking powder
1 tsp each: baking soda, cinnamon, nutmeg, salt
7 1/2 tbsp butter
1/3 cup honey
1 1/2 cup ripe banana
1 egg
1 1/2 tsp vanilla
1/2 cup yogurt

Preheat oven to 350 degrees. Oil muffin tin. Sift dry ingredients. Cream butter and honey. Add banana, egg, and vanilla. Add half the flour and mix on low. Add yogurt and the rest of the flour. On high blend for 1 minute. Bake 18-20 minutes.

Icing:
4 oz cream cheese
1/4 cup honey
1/2 tsp orange zest
Whip in mixer.

Thursday, August 11, 2011

Cupcake Therapy

    Close to Famous
    I just read Joan Bauer's young adult novel Close to Famous in which Foster McFee bakes to get through the bad days. In Foster's words, "Cooking is about life. It gives us what we need to keep going, and it gives us something to share with other people." I have not broken my pact since the book does not contain lists of recipes.   Joan Bauer's signature quirky books don't have your typical teenagers or teen angst situations.  Foster is a tough twelve-year-old who is dealing with a move to a new town and getting over her fear of Elvis impersonators.  When her father passed away she started watching the Food Network and dreams of being the first kid to have her own cooking show.  Many colorful Southern townspeople pepper her summer experience.  I'd love to tell you more, but I don't want to give away the whole book.  Let me just tell you her cupcake creations are described in such detail that you will be inspired to close the book and rev up the mixer.   Stay tuned for the banana muffins and zucchini bread recipes that I cooked up after reading this tasty novel!

Wednesday, August 3, 2011

Peaches 'N Cream

    We brought out the basket to pick the hundred peaches off our tree.  The baseball sized fruit is ready and I am not letting any birds peck at them before I get them.  You can eat them right off the branch, but it's best to have 2 napkins for these juicy beauties. Somewhere in the back of my mind is the goal to can this abundance, but in the meantime my favorite treat is to serve them up sliced with whipped cream.  No there isn't any cobbler in there, just peaches and cream.  It's a wonderful, easy treat on a hot night. 

Whipped Cream
from: Betty Crocker's Cookbook

For 1 cup whipped cream: Beat 1/2 cup whipping (heavy) cream and 1 tbs powdered sugar in a chilled small bowl with electric mixer on high speed until soft peaks form. I omit the sugar and opt for 1 tsp vanilla.

Sunday, July 24, 2011

Summer Grillin'


Happy Lentil Burger
   
    It's summertime and the grilling is easy.  Well it is nice to cook on the grill, but these burgers I actually made in the oven.  I was surprised at how tasty the lentil burgers turned out.  With the pickles and other finishing touches the presentation looks "burger like".  I would recommend modifying this recipe to make a lentil "meatlessloaf".  I served them with a side of vegetables.  A nice summer addition would be potato salad or one of the side dishes from my "Never Ending Salad" post.  I used oat flour in lieu of the breadcrumbs. Remember to serve them on Mondays to bring you luck with money. I always keep lentils handy in the pantry.  They don't take up much room, don't need to be defrosted like meat and have much easier preparation process compared to dried beans which need to be soaked before cooking.

Greek Lentil Burgers
from: Moosewood Restaurant Cooking for Health

Boil 1/2 cup dried brown lentils and 2 cups water.  Cook for 30-40 minutes over medium until tender. Drain lentils. Brown 1 chopped onion and 1/2 tsp salt for 7 minutes. Add 4 garlic cloves, 1/2 cup diced red pepper, 2 tsp cumin, 1 t coriander, 1/2 tsp pepper and cook for 5 minutes. Stir in 1 tsp each: dill and oregano. In a food processor, pulse 1 15 oz can chickpeas and 2 eggs until smooth. In a bowl, combine chickpeas, cooked lentils, vegetables and 1 cup breadcrumbs. Form 4 balls and roll in additional breadcrumbs. Flatten and bake at 350 degrees for 25-30 minutes until golden brown and firm. 


Sunday, July 17, 2011

Eggplant "Parma"-yum!

My version of Eggplant
   My latest favorite recipe did not come from my mountainous pile at all, but from my experiments in the kitchen.  After a trip to the market one Sunday afternoon I was inspired to whip up eggplant parm.  Without any bread crumbs in the house I made up my own concoction using oat flour and spices.  I served it over leftover brown rice the first time and you can see it pictured here over sauteed spinach with garlic.  The third time I felt it was ready for company so I made a huge batch and served it over brown rice spagetti for a gluten-free meal.  I served it dairy-free, but add your favorite mozzerella if you have it. Frying the eggplant gives it a meaty texture so it's great for company.  I used the leftover egg mixture to make "protein nuggets" and served them in the sauce.  They were such a hit I made them again a week later and let the kids dip them in mustard like chicken nuggets.   If you have eggplant growing in your garden, this is a wonderful dish and don't forget the delicious ratatouille recipe featured in my prior posts.

Eggplant Parma-yum

1 large eggplant (I used 2 when we had company)
2 cups oat flour
1 tbs oregano
1 tbs seasoned salt
2 eggs

    Scramble the eggs in a bowl.  Add flour and spices to a second bowl.  Peel and slice eggplant in circles.  Dip eggplant in egg, then in flour.  Fry eggplant in hot skillet with olive oil for 3 minutes on each side.  I like to cook them until they are firm, but not mushy.  Cook in batches until all the eggplant is cooked, setting aside the fried eggplant covered to keep warm.  Serve with spagetti sauce over pasta, rice or my favorite fresh spinach sauteed in garlic. 
    To make protein nuggets, add the leftover flour to the beaten egg.  Mix well.  Pour in the skillet and let set.  When it gets firm, flip it like a pancake.  Let the other side brown and cut into strips or small squares.  These are great for dipping or adding to the spagetti sauce.

Wednesday, June 22, 2011

Popeye's Special- 2 Recipes For the Price of 1

   Whenever I ask for a vote for dinner, the answer is usually "Caldo Verde."  This new recipe has become a favorite in the weekly menu planner.  This filling soup is great for a chilly or rainy day.  Even those who profess to not eat onions gobble it up since the onions are pureed so there is nothing to pick out.  Using my hand blender makes the job much easier than transferring batches to the food processor. The recipe says spicy sausage can be added as well, but we have been very pleased without it.  A few simple ingredients make a very satisfying soup. I use fresh or frozen spinach in lieu of the kale, chard, or collards.  This summer I will have to try it with Swiss chard when the garden starts producing.

Caldo Verde (Portuguese Green Soup)  from Vegan Kitchen by J. Bennett
1 diced onion
1 minced garlic
6 potatoes, sliced not peeled
1 1/2 tsp salt
1/2 tsp white pepper
1 lb kale, chard, or collards

Saute onion and garlic for 3 minutes. Add potatoes and cook for 3 minutes. Add 2 quarts cold water, boil. Simmer 10 minutes until the potatoes are soft. Puree potatoes. Roll greens into cigars and chop.  Add greens and simmer for 5 minutes until greens are bright and tender.

Bonus Hidden Spinach Recipe #2
    My second recipe is not new to me but is another popular spinach dish in my house.  In fact this has been my son's favorite meal since he could eat table food.  When he was a baby I became a fan of Rachel Ray's 30 Minute Meals and actually tried some of the recipes. It's a great way to get those extra greens in my diet.  I like it with the feta cheese, but I often make it without it as well.  I sometimes skip cooking the onion and just throw everything in the mixer. The original recipe calls for the turkey burgers to be served on a bun with roasted red peppers, kalamata olives, and pepperonchini.  I usually skip the bun and serve smaller burgers with a big Greek salad. You could try pairing it with a steaming bowl of CaldoVerde. They are awesome cold if you manage to have any left.

Spanakopita Burgers
from Rachel Ray's 30 Minute Meals

3 cloves garlic
1/2 red onion, chopped
10 oz frozen spinach, defrosted
2 tsp oregano
1/4 lb feta crumbles
1 1/3 lb ground turkey or chicken
1 tbs grill seasoning

    Sautee garlic and onion for 5 minutes and set aside to cool. Wring defrosted spinach by twisting it in a clean kitchen towel over your sink. To the spinach add the cooled garlic and onion and oregano. Add feta crumbles then ground turkey, grill seasoning and a drizzle of olive oil.  Mix and form into 4 patties, 1 inch thick. Raise heat to medium high and cook 6 minutes on each side.

Monday, June 13, 2011

Never Ending Salad

    So much has been going on here that I have been neglecting my duty to spread recipes to the greater good.  I can blame it on the holiday weekend.  I can blame it on the 90 degree weather since I didn't even want to go near the stove on those days.   Now that I am back from camping and catching up on a pile of laundry from our rainy woodland adventures it is time to get back to business and catch up on my writing. 
    I have been veering off the recipe pile lately and coming up with my own creations.  There is something fun about coming up with a nice meal with only a few ingredients.  While away I made a three bean salad that morphed into another meal of pasta salad and then evolved into a mayonnaise based veggie and pasta culinary delight.  It became the never ending salad for our Memorial day weekend.  It would be great for another summer trip, picnic or hot evening meal.  Keep in mind that I didn't use a recipe as we try to re-create my weekend salad.

Never Ending Salad (aka leftovers that keep on leaving)

Day 1- 3 Bean salad
2 cans green beans, drained
1 huge can, kidney beans, drained (but not rinsed)
1 can black olives, drained
olive oil
vinegar
oregano, season salt

I poured all the canned items into a big bowl, added about 1/4 cup olive oil (I didn't pack measuring cups), 1/8 cup apple cider vinegar and 1 tablespoon each

Day 2- Pasta Salad

1 bag Tinkayada brown rice shells
1 cup broccoli florets
1/4 cup salsa

   I boiled a bag of pasta shells for lunch and added the leftovers noodles to the 3 bean salad with some chopped broccoli.  I poured in 1/4 cup salsa and stirred everything up.  The vinegar and spices from the 3 bean salad made a nice pasta salad that everyone enjoyed.

Day 3- Veggie Salad

1/4 cup Vegenaise
1 cup cauliflower pieces

    My husband added Vegenaise and cauliflower and we had a whole new flavor for the third salad night.  This time we finished it off.
  

Saturday, May 21, 2011

Garbage Day Creations

Greek Vegetable Pie
   In these interesting economic times I am trying to use up food as a way to stretch our budget.  No matter what the price of an item, if it ends up in the garbage that is wasted money.  In an effort to reduce waste I have taken to meal planning.  I started reading up on "Once a Month Cooking" and love the idea of not having to scramble at the last minute for dinner.  However, I find cooking for the whole month to be a bit intimidating.  I try to map out dinner for the week.  That way we use what we have before heading to the store to buy more and toss the fresh veggies that lay in the bottom of the crisper or get pushed to the back of the shelf.
   This recipe, like soup,  is a great way to use up what's in the fridge before garbage day.  We usually have leftover brown rice.  Since it takes a while to make we tend to cook large batches.  My husband freezes them in steamer bags for later use.  The recipe originated from the Moosewood Vegetarian cookbook, but I spilled egg on it and had to work from memory.  Needless to say I have taken artistic license. I recommend checking out their version.  It called for leeks and for some reason I was fresh out.  The recipe calls for asparagus and we had it leftover from dinner so in it went.
   I have served this dish for holiday brunch, dinner and lunch and breakfast leftovers.  I like it hot or cold and it would be nice for a picnic.  It's become one of my favorite dishes both for it's versatility and taste. This week I made it with broccoli, green pepper and fresh spinach before they headed to the trash.  I didn't have any cheese on hand and it turned out fine. I sauteed up the vegetables and popped it in the oven at 8am and had dinner ready to go on a busy weekday.  I just love not having to make dinner at dinnertime.

Greek Vegetable Pie
from: The Moosewood Restaurant Cooking for Health: More Than 200 New Vegetarian and Vegan Recipes for Delicious and Nutrient-Rich Dishes

2 cups cooked brown rice
1/4 cup Greek olives
1/2 cup nuts (I use pumpkin seeds)

Pulse in food processor and press into 9 inch oiled pie plate.

Saute 7 cups vegetables.  Asparagus, spinach, leeks, broccoli, red peppers, etc.
Add 3/4 cup cheese
1/3 cup dill
3 eggs beaten
Pour all ingredients into crust.
Top with 1/4 cup cheese

Bake at 350 degrees for 35 minutes until set and golden.  Serve with salad.

Wednesday, May 11, 2011

Hummus is Yummus

Homemade Hummus
   I don't know about you, but I enjoy a good hummus.  Unlike my misadventures in falafel making the hummus recipe turned out quite well.  I omitted the tahini due to allergies and served it with raw vegetables, Greek olives and the ill-fated falafel.  It's a great way to get more carrots and broccoli into my diet.
    Chickpeas are a good source of protein. It's actually pretty simple to make and doesn't take a lot of exotic ingredients. I used a food processor instead of a blender. I recommend this recipe for a weekday meal, snack time, a party or company meal or anyone with kids around who like to dip. 

Hummus
from Eat Cheap, but Eat Well by Charles Mattocks

1 14.5 ounce can chickpeas, drained
1/3 cup lemon juice (or juice of 2 medium lemons)
3 tablespoons tahini
1 clove garlic, halved
1/2 teaspoon salt
1/4 teaspoon ground cumin
olive oil
1 tablespoon chopped fresh parsley (optional)

Add chickpeas, lemon juice, tahini, garlic, salt and cumin to a blender. Process until the mixture is smooth, adding a little water if the hummus is too thick. Transfer to a small serving dish and drizzle a little olive oil on top. Garnish with chopped parsley.  This makes 2 cups of hummus.

Thursday, April 28, 2011

Fingerprint Fudge

   I've made this recipe a few times with mixed success.  It always comes out like "real fudge" in taste; it is the presentation that doesn't fare well. The first time I made it I planned to bring some on a visit to my friend to see her new baby.  I skipped the parchment paper and used a baking pan to try to get more squares. I spread it too thin and tried to cut it with a pizza cutter.  It stuck so badly I had to pull it off the cutter with my fingers, hence my re-naming of the recipe. I had softened the butter in the microwave and thought that might have affected the consistency. 
    The second time I spread the fudge out on aluminum foil, thinking it would be easier.  Boy was I wrong.  It was really interesting trying to peel it off and not get any Reynold's wrap in your dessert.  Thinking the third time must be the charm, I persevered. I planned on using cookie cutters to make a holiday treat and it just didn't want to come out of the pan.  I finally gave up and cut little squares and put them on a plate to go.  It almost looked more like hard cake frosting.
    I gave it one last shot.  This time,  I followed the recipe's advice to use parchment paper in the proper size pan and hey, it actually worked!  I don't have a picture to share, not because I'm embarrassed, but because it all got eaten!  I have stuck by this recipe because the fudge is deliciously sweet while the fact that it is caffeine and sugar free makes it a guilt-free dessert.  It may take a little patience, but it is worth the work.  Or you could try reading the recipe and actually following directions if you want to make things easier on yourself.  Please take my advice and use the parchment paper.  Otherwise, you are just asking for fudge heartache.  Trust me; I've been there.

Carob Fudge
(source unknown, I got this one from my nutritionist Anne)

makes about 1 dozen small squares

1 cup softened butter, preferably raw butter
1 cup raw honey
1 cup carob powder
1 tsp vanilla extract
2 tsp chocolate extract (optional)
1/2 tsp sea salt

    Place all ingredients in food processor and process until well blended. Line a large loaf pan with parchment paper and spread mixture about 1/2 inch thick.  Wrap up in parchment paper and refrigerate several hours. Cut into small squares and store in an airtight container in the refrigerator.

Thursday, April 21, 2011

Easter Eggplant

    There's a joke in my house.  Every time I buy an eggplant, my husband says, "How long before I throw this one in the garbage?"  A few years back I got into the habit of buying eggplants and never getting around to cooking them.  In fact, I did that with a lot of food.  Now I try to cook around what I have, not what I am in the mood for that day. So, naturally he was skeptical when I bought two eggplants this week.  I am happy to report that the latest eggplants did not rot in vain and actually make it to the dinner table in a delicious dish I will add to our recipe binder. This recipe does take awhile, but it produced a big batch.  I was tempted to skip the extra step of letting the eggplant sit, but as soon as I salted it, my neighbor pulled up to deliver eggs.  She has her own chickens and her eggs are the best. By the time we were done chatting I only had 15 minutes left on the eggplant prep and I still had to prep the other ingredients. The timing worked out perfectly.  Next time I will have to freeze some so I have it on hand.  We just ate it for lunches and never tucked away any in the freezer.

Ratatouille
from: Tosca Reno's Eat Clean Cookbook
I modified the recipe to what I had on hand.

2 eggplants
2 zucchini
2 green peppers- I used 1
2 red peppers- I threw in some canned red peppers at the end instead
4 onions- I think I used 1
6 tomatoes- I substituted 1 can Muir Glen Fire Roasted tomatoes, including liquid
6 cloves garlic
2 Tbsp oregano
1 tsp thyme
1/4 cup fresh basil- I used dried
1/4 cup fresh dill- I used dried
3 1/2 tsp sea salt
black pepper

Peel and cube eggplant. Toss with 2 tsp salt and cover for one hour.  Transfer to colander and rinse well. Pat dry.  This reduces the bitterness in eggplant. Preheat oven to 350 degrees.  *Saute eggplant and vegetables in batches. Toss the herbs, garlic, sea salt and pepper into remaining liquid and cook until fragrant. Coat a roasting pan with olive oil.  Bake uncovered for an hour.  Serve over brown rice or as is.
* I skipped the sauteing of vegetables and spices and went straight to putting the vegetables and spices together to roast in the oven.  Afterwards, I added some roasted red peppers.  It was delicious.

Tuesday, April 12, 2011

Fal-Awful

Falafel- Take one, baked
I'm not sure when a became a falafel fan, but I decided to try to make my own.  Notice I used the word try.  I was afraid of the splattering oil of deep-frying, so the first time I baked it in the oven.  It was good, but very fragile and not at all like my favorite restaurant.  My second attempt I fried it since I thought that would make it more like the "real thing."  I mixed up the falafel and everything was going well until I dropped them into the hot oil.  The falafel balls just melted into the oil, completely losing any shape.  I scooped up the falafel mush and smeared it onto a spinach wrap with some kalamata olive spread.  It wasn't pretty, but it still tasted good.  I inquired at the restaurant and was told I may have had too much moisture since I used canned chickpeas instead of dried.  I guess there are no shortcuts on the road to good falafel.

Falafel
from: Eat Cheap, but Eat Well by Charles Mattocks

1 16 ounce bag dried chickpeas (aka garbanzo beans)
1 medium onion, chopped
3 tablespoons chopped fresh parsley
3 cloves garlic, chopped
1 teaspoon ground coriander
1 teaspoon ground cumin
Salt and freshly ground pepper

1. Rinse the dried chickpeas and soak them in enough water to cover overnight, until softened. Drain and add to a saucepan with 2 cups fresh water. Bring to a boil, then simmer for 15 minutes. Drain and let cool.
2. In a food processor, combine the cooked chickpeas, onion, parsley, garlic, coriander, and cumin.   Add salt and pepper to taste; then add the baking powder. Blend into a smooth, thick paste. Form the mixture into small golf ball-size balls, flattening them slightly so they don't roll.
3.  Add enough canola oil to a large skillet to fry the falafel (about 2 inches) and set over medium-high heat. When the oil is hot, carefully add the falafel balls and fry until crisp golden brown, about 2 minutes per side. Drain on paper towels.  Alternatively, bake in oven at 475 degrees for 10 minutes on a greased cooking tray.

Wednesday, April 6, 2011

Lent-ils

    There are many reasons to add a meatless meal or two to your recipe stash be it religious, philosophical, health, or economic.  With the price of meat these days adding a meatless meal a week can be a way to trim the grocery bill.  I never thought I could live without protein at every meal and yet I have recently come to appreciate a good bowl of beans and rice.  I like the convenience of working with legumes.  There is no meat to thaw out or worry about spoiling.  A bag of beans or lentils takes up little room in my pantry and is always there when there is a snowstorm preventing a trip to the market.  My friend has told me that in Peru, lentils are eaten on Monday to bring prosperity.  It was a rainy day Monday, so I cooked up a batch of lentil soup. I had two recipes so I picked the one with the ingredients I had on hand and took some liberties with it.

Lentil and Spinach Soup
from: Vegan Kitchen by J. Bennett

2 diced onions                                                  
1 tsp minced garlic                                            
4 stalks celery                                                    
2 medium diced carrots                                      
1 1/2 tsp basil
1/2 tsp thyme
1 bay leaf
2 cups brown lentils, washed
1 tsp salt
1/4 tsp pepper
4 cups chopped spinach

Saute vegetables and spices.  Add lentils and 2 quarts water. Bring to a boil. Simmer 15-25 minutes. Add salt, pepper, and spinach.  Discard bay leaf. Serve immediately.

Shorcut Lentil Soup
Well, that's the recipe version.  Here's what I did:

2 cups lentils (green since that's what I had)
1 box Pacific Foods vegetable broth (it was on sale this week)
1/4 cup dehydrated vegetable flakes (mix of carrots, peas, green bean..)
2 tsp each- dehydrated onion, garlic
1 1/2 tsp, basil
1/2 tsp thyme
1/4 cup quinoa (I learned the hard way this stuff expands)

  I set the crockpot on high for 4 hours and dumped all the ingredients in filling it to the top with water. One hour before dinner I added 1/2 bag of frozen spinach.  The soup came out great and I was even asked what kind of meat was in it since it smelled so good.

Saturday, March 26, 2011

Pulling the Weeds from My Recipe Garden

The recipe cabinet overflows.


   Hooray, the first step is done.   I set aside twenty minutes a day to go through recipes.  I started with the loose recipes that were just scattered about the cupboard.  First, I removed any recipes that I just don't see me cooking because they are too time-consuming for my current lifestyle or they have funky ingredients.  Let's face it, cabbage is not very popular with my crowd.  Next, I ditched the duplicates.  When I get on a roll apparently I can copy down four or five bean soup recipes.
   Whatever recipes were left went in the "New Recipes"  binder if I haven't made them yet.  Special recipes like Grandma's Zucchini Bread that I don't make everyday, but I had to keep for sentimental reasons, went in the "Favorites" binder.  The third binder is my go to binder for   everyday meals.  This is the one I hope to be building up for meal planning ideas.
     I also weeded out the cookbooks.  This was harder.  One went because it was a basic cookbook and I already had two basic cookbooks.  One was a food network star that I had two of so I picked the one I liked best to keep.  I gave away many small pamphlet type cookbooks since much of that informaion is available online.  That left me with five cookbooks to donate to the library booksale. 
   Working in bits each day, I chiseled away at the mountain of papers.  I thought it would never get done, but after two weeks I made steady progress at taming the mess.  Now on the real challenge, cooking all those delicious dishes.